Computer Concepts in Action ©2009Unit 6:
DatabasesNature on a RampageIntroduction
The Task
Process
Guidance
Resources
Introduction
You have become interested in the power of nature as displayed in natural disasters.
One of your teachers has noticed your interest. She has asked you to help her
with a research project. You are to gather information about natural disasters,
design a database (in Microsoft Access) to hold the information, and answer
questions based on the information you have gathered. You will gather information
on 6 natural disaster events. Top The Task You will research information about three of the following types of nature
disasters: hurricanes, volcanoes, tornadoes, or earthquakes. Below is a brief
description of each of your tasks for this WebQuest: Task 1: Explore and Take Notes
As a natural disaster researcher, your first task is to gather factual information
from different sources. Task 2: Organize and Design your Database
Your next task is to organize your research findings and design a database for
the information. You will develop your initial design using paper and pencil,
note cards, or even sticky notes. Task 3: Design your Table in Access
Next, you will use your database design sketches to create the table for your
database in Access. Task 4: Complete the Database
Finally your will enter your research findings into the database, create a report,
and, with your teacher’s permission, post your database on the Internet. The Process section below has a detailed description of each task. Also, the
Guidance section has some helpful hints, and the Resource section has useful
Web sites for you to use. Top Process When you write an article based on research, your process can be broken into
several steps. Before you start, decide on three nature disasters types you
wish to research: - Hurricane
- Volcano
- Tornado
- Earthquake
- Wildfire
- Avalanche
- Tsunami
- Landslide
- Typhoon
List each type of disaster you have chosen on a separate index card. This will
help you as you take notes. Task 1: Explore and Take Notes
A good researcher uses several different sources. If you use only one source,
the information you find may be too limited or too slanted in one direction
(this is called bias, and good researchers try to avoid bias). You may use the
URLs in the Resource section below for your research or find print or Internet
sources of your own.
As you investigate, ask yourself the following questions about each disaster:
- What type of disaster is it?
- Where did it happen?
- What caused it to happen?
- When did it happen?
- How severe was the damage? Rate the severity on a scale of 1 to 5, 5 being the
most severe. For help on rating natural disasters, see Guidance below.
You will search at least three Web sites and review the information from each
site carefully. When you explore, think about the material you are reading.
Ask yourself what the information tells you. Make notes about what you learn
from each source. As you research information, you will need to make notes about what you find
out. If your teacher allows, print the page(s) for your research files. Otherwise,
take detailed notes including the site URL, the author, the date you visited
the site, and any other information you may find useful. And remember—it
is a form of plagiarism to copy any text directly, unless you say that it is
a quote, and cite the source. For extra help on how to take good notes, go to Guidance below. Task 2: Organize and Design your Database
Your research notes now need to be organized into a table design. It can be
tempting to start working with Access right away, but planning on paper first
can save you time in the long run. If you just start working in Access too soon,
you may find that you will have to spend many hours revising your work.
Before you start designing on paper, determine what questions you want your
database to answer, such as: - Which earthquakes (or other disaster) were the most severe?
- Where do most earthquakes (or other disaster) happen?
- Where can I find more information about a particular hurricane (or other disaster)?
The answers to these questions will give you an idea of the fields you may
want to include in your first table. Use this list to help you define your fields:
- Type of disaster (earthquake, hurricane, tornado, or volcano)
- Name of the disaster
- When it happened
- Where it happened
- Number of deaths
- Degree of severity (assign a number from 1 to 5, 5 being most severe)
- URLs for additional information
Feel free to add any other fields you find interesting or valuable. Sketch out what your Access table will look like, using paper and pencil. Or
you might want to create your table using sticky notes so you can easily move
items around and see what the best table design would be. Think about what filters
you would create to find the answers to your questions above, and see if what
you have designed will give you the results you want. For help on database design, refer to the Guidance section. Task 3: Design Your Table in Access
Finally, it is time to open Access and apply the design.Based on your paper
design, create your first table in Design View and assign field names to the
categories you want the database to include. Some examples of field names are
included in the table below. Listing them in a table is a good way to determine
your field names. Design your Access table using the following structure:
Figure 1, Table Structure
CATEGORY | FIELD NAME | Type of disaster | Type | Name of the disaster | | When it happened | | Where it happened | Location | Degree of severity | | Number of deaths | | URLs for additional information | | Picture, video, or other graphic if available | |
Once you have decided on the structure of your table, create it in Access.
Your table could look like the one below.
Figure 2, Sample Table 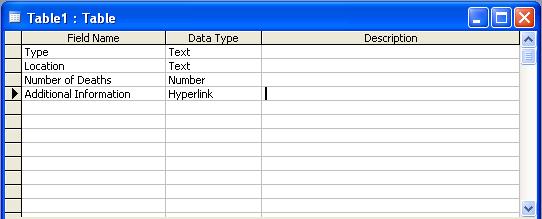 <a onClick="window.open('/olcweb/cgi/pluginpop.cgi?it=jpg::::/sites/dl/free/0078805775/595820/6_2_table.JPG','popWin', 'width=NaN,height=NaN,resizable,scrollbars');" href="#"><img valign="absmiddle" height="16" width="16" border="0" src="/olcweb/styles/shared/linkicons/image.gif"> (23.0K)</a> <a onClick="window.open('/olcweb/cgi/pluginpop.cgi?it=jpg::::/sites/dl/free/0078805775/595820/6_2_table.JPG','popWin', 'width=NaN,height=NaN,resizable,scrollbars');" href="#"><img valign="absmiddle" height="16" width="16" border="0" src="/olcweb/styles/shared/linkicons/image.gif"> (23.0K)</a>
Refine Your Table Design
Before you enter all your research data into the table, make sure the table
is designed as it should be. Enter only 2 or 3 records into your table. Try
out some filters for specific information to see if the table is well-structured:
- Filter for a specific natural disaster with a severity greater than 3.
- Filter for a specific natural disaster, date, and location.
- Filter for a specific natural disaster and URL.
Do these work for you? Try others to see if the information the filters give
you is useful. Evaluate Your Database
As you try out your database, you may discover that it needs improvement. Here
are some things to look for:
- Did you include all the fields that you need?
- Does your table contain the same information in more than one field?
- Were you unable to find information for one of the fields? You may need to delete
the field.
- Does your table contain too many fields? You may need to delete one or more
of the fields.
Task 4: Complete your Database
After you have tested your table using filters on 2 or 3 records, you are ready
to complete your database. Follow these steps:
- Enter at least 8 records.
- Provide filters or sorts for the following:
- The most severe natural disasters (those you rated 3, 4 or 5)
- The location of the most natural disasters
- URLs where you found the information about a particular type of disaster
- The most recent disaster to the earliest.
- Create a report using the Report wizard. Title your report, “The Most Severe Disasters.” The report should show:
- The most severe natural disasters (those you rated 3, 4 or 5).
- The date of each disaster.
- The location of each disaster.
- The number of deaths in each disaster.
- If your teacher permits, place your database on the Internet. Instructions for converting an Access database for use on the Web are given below under Guidance.
Top Guidance Rating Natural Disasters
You will often see a number associated with a natural disaster. For example,
you may hear of a 6.2 earthquake. However, natural disasters do not all use
the same scale and some do not have a commonly used system:
Hurricanes are rated by assigning numbers from 1 to 5, with 5 as the
most severe. Earthquakes are typically rated on the Richter scale, which ranges
from 1 to 9. Tornadoes are rated according to wind speed. The most common scale,
the Fujita Scale, ranges from F0 to F6. |
So, unless you decide to populate your database with only one kind of natural
disaster, you will have to change the numbers. To simplify matters for your
database, use a scale of 1 to 5 for degree of severity: with 1 as weak, 2 as
moderate, 3 as severe, 4 as very severe, and 5 as devastating. Data Types in Access
When you create an Access table in Design View, Data Type fields are used to
define the characteristics of each Field Name that you enter. You can choose
from the following Data Type fields as you create your table. Be sure to use
the right Data Type field for the type of data you will enter in the table.
- The Text field can contain numbers. If you choose to list only the year for the date, you can use a text field.
- The Number field contains numbers with or without a decimal point. If you choose to include arithmetic calculations, you can use a number field.
- The Date/Time field can contain dates and times. Data used in a Date/Time field can be used in date and time calculations.
- The AutoNumber field automatically assigns consecutive numbers to each new record, and is often used as the primary key.
- The Yes/No field is known as a logical field. You can also assign “True” or “False” to the data in this field.
- The Hyperlink Data Type holds the URL of a Web page or a document. The user can click to display the hyperlinked object. NOTE: if you wish to make corrections to a hyperlink in Access, you need to press the F2 Function Key. Otherwise, you will be jumped to the linked page.
Steps to Follow When Creating Your Database
When you begin to create the table, do not worry if things are not perfect
at the start. You can refine it as you continue working. The important thing
to remember is to have a strong design on paper first. Then, create your table
in Access. Check your work before entering too much data. Make changes if needed
as you create the table or enter data. The important thing is for the database
to work. You should be able to filter to find the information you want.
- Decide on the purpose of your database. You need to research information and decide which facts you wish to enter in Access. (Tip: Start out with paper. Then try it out with sticky notes.)
- Decide what fields you need. Decide on the categories of information you want to include in your table(s). Each category of information in a table is displayed in a column and is called a field. For example, one field in a natural disasters table could be Name, and another could be Type.
Figure 3, Fields in the Table 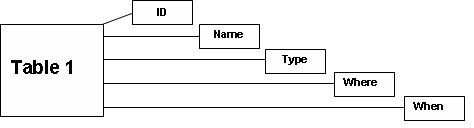 <a onClick="window.open('/olcweb/cgi/pluginpop.cgi?it=jpg::::/sites/dl/free/0078805775/595820/6_3_Table_Fields.jpg','popWin', 'width=NaN,height=NaN,resizable,scrollbars');" href="#"><img valign="absmiddle" height="16" width="16" border="0" src="/olcweb/styles/shared/linkicons/image.gif"> (6.0K)</a> <a onClick="window.open('/olcweb/cgi/pluginpop.cgi?it=jpg::::/sites/dl/free/0078805775/595820/6_3_Table_Fields.jpg','popWin', 'width=NaN,height=NaN,resizable,scrollbars');" href="#"><img valign="absmiddle" height="16" width="16" border="0" src="/olcweb/styles/shared/linkicons/image.gif"> (6.0K)</a> - Improve your design. Check your database for any errors. Do you get the results you want? Analyze and refine your work until it gives you the best results.
Tip: Remember, if you delete a field, you will lose all the information you
entered into that field. Also, if you change a field’s data type, you
may also lose data. For example, if you change a Text field to a Number field,
only number characters are retained. You will loose all the text characters. Placing Your Database on the Web
Reports in Access can be placed on the Internet or local Intranet. When you
have completed your database and tested it, you may wish to place it on your
school’s Web site, if your teacher permits. To create data access pages,
follow these steps:
- In the database window click Pages, and then click New.
- In the New Data Access Page dialog box, click Page Wizard,
and then click OK. The Page Wizard dialog box will appear.
- Under Table/Queries, choose the table you wish to appear on the Web.
- Choose the fields you want to appear on the Web. Move them to the Selected Fields area using the arrows.
- When you are finished selecting the fields, click Next.
The Grouping box appears.
- If you decide to use a Group, enter it here. Otherwise click Next.
The Sort box appears. Click Next to continue past the sorting
option.
- Click Finish, and enter a name for your page.
To view your page as it will appear in a browser, click View
in the menu bar and select Page View. Your new page will appear
in your default browser. A navigation bar at the bottom will allow the user
to move through the records. Top Resources FEMA for Kids: The Disaster Area
This site from the Federal Emergency Management Agency is a good introduction
to natural disasters. Volcanoes!
This site at the University of North Dakota is a comprehensive source offering
information on current eruptions, movie clips, maps, and much more. National Geographic: Nature's Fury
This page has links to sources of information on volcanoes, tornadoes, hurricanes,
earthquakes, and other natural disasters. Costiest U.S. Hurricanes 1900-2000
This National Weather Service report lists the nation’s costliest hurricanes
from 1900 to 2000. The Most Intense Hurricanes in the United States: 1900-2000
This National Weather Service report lists the nation’s most intense hurricanes
from 1900 to 2000. USGS Earthquake Hazards Program
The U.S. Geological Survey has a lot of information on earthquake activity all
over the world. Click on the “For Kids” tab on the menu bar for
games, fun facts and much more. Tornado Project Online
This site is a good source of information about tornadoes. Go to the link titled
“Tornado Top Tens” for a list of the most destructive American tornadoes
in history. To search for more information on the Web go to Google
or another search site. Try the keywords “Mt. St. Helens” to search
for sources on this volcanic eruption. Try “Mt Vesuvius” to find
out about how it destroyed the city of Pompeii, and how it continues to erupt
from time to time. Conclusion You deserve applause for completing this WebQuest! Your teacher is very pleased
with your research listing the details of 8 natural disasters. She is especially
pleased with how the report looks on the Internet. Congratulations!  |  |